Showing posts with label UFO management. Show all posts

Saturday, October 17, 2015

Organizing My Project Queue Part 3

Thanks for hanging in there with me.  If you've made it this far you've done a lot of  work.  This post is about keeping the system going and maintaining the flow of projects.  At this point, you've used Excel to list most, if not all of your projects that are in progress or that you want to start in the future.  You've set up what you intend to do for this week and what you might do in the coming weeks.  You've started to color-code tasks as you work on them.

Take stock at the end of the week.  Let's look at what did and did not get done.
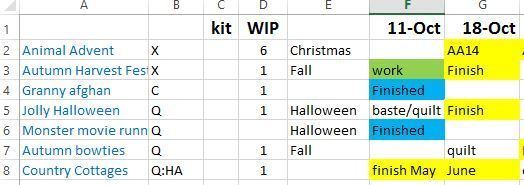
I'll use my list as an example.  I finished two projects, and changed them to blue (yay!).  I worked on My "Autumn Harvest Festival" so I changed that to green.  I didn't get to my Jolly Halloween quilt so it's still white, and I didn't finish my Country Cottages block for May, so that deadline was not met.  Life happens.  This is all okay.

In the WIP column, I can now remove the "1" for each of the finished projects.  This makes my total at the bottom of the page lower. (yay!).  You can see that I've done that for the monster movie runner but not yet for the granny afghan.

Shift any boxes that need to be moved to next week.
My Jolly Halloween and Country Cottage projects need to be moved out now.  Here is where the excel program does its magic.  On this week, I click on the box of the task that I want to move and click "insert." Excel brings up a dialog box with some options.
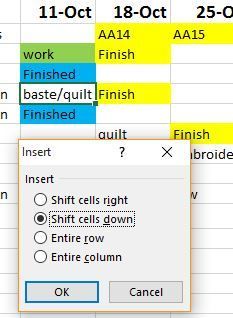
The default is "shift cells down" but what you need to click instead is the first option "shift cells right."  Look what happens when I do that:

It moves both the task and the target finish date out a week.  This is great if you have a whole long set of tasks for your project.  Everything gets moved at once.

Now I have a new finish date for this project which is the week of October 25.  Still before Halloween, so that's fine with me. There's a pileup of too many tasks for the week of October 18th though, and I'll get to that in a minute.  First, how to handle that column for the week that is finished.

Keep a separate Excel sheet for your finished projects.
Down at the bottom of the excel spreadsheet is a little tab with: a + sign to add another sheet.  Open a new sheet and paste in the top few projects and the first week's column. Be sure you use COPY and not CUT or you'll lose the original data from your worksheet.

This big copy and paste only works for the first week.  Each subsequent week you'll need to manually enter a column for the week and enter what got finished.  I put the newest column to the left.  Here is what mine looks like before adding the October 11 data:
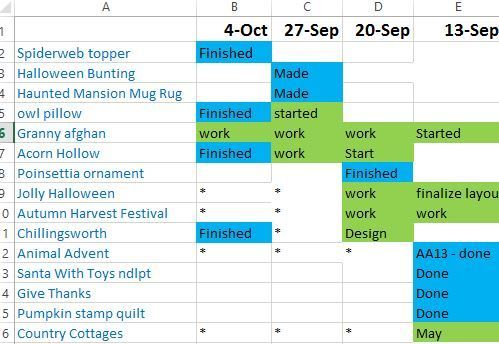

This makes me happy.  All those blue finished projects.  I can see the green squares that showed me the weeks I worked on each.  Projects that didn't get finished or worked on get an asterisk, to help me keep track of them.

Go Back to your original spreadsheet and plan this week.
After moving my finished projects to my finished sheet, I could delete the old week and I've got the upcoming week to deal with.  It looks like this.
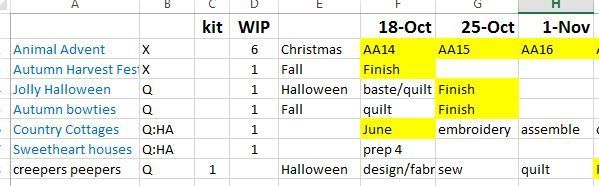


 That's too many things for me to do in one week.  Some will get deadlines pushed out.  Some might get put off until next year.  I'll shift things around and re-prioritize until I have a reasonable number of things to work on for the coming week.  I might also look ahead to the coming season and decide to start some Christmas projects.

I know these posts are long and may seem complicated, but once you have the system set up it's a lot of fun to manage it.  I feel that I have more control over my UFOs and WIPs than I ever have before.  I'm getting a lot of things done because they're receiving the attention they deserve.  I don't feel guilt about projects that are waiting because they're all on the list and ready to move up to the top as space clears for them.

I'm sure you have questions.  Ask me in the comments or contact me by email.  The link is in my sidebar.  Are you planning to implement all or part of this plan?  I'd really love to hear from you.


Thursday, October 15, 2015

Organizing My Project Queue Part 2

This is a continuation of the process I started outlining in this post.  You will need to complete those steps first before you can begin this section.

You now have a long list of projects, you can tell whether or not you've started each of them, and for some of them you've indicated that they belong to a special season or purpose.  Good job!  Collecting all the information is half the battle.

For my purposes, I'm going to assume that you actually want to finish every single thing on your list.  If there are some items that need to be tossed or given to somebody else to love and finish, then take them off your list and do get them out of your house this week.   Your list should be a happy reminder of all the things you really want to do.

For the next six columns on your spreadsheet, I want you to fill in dates a week apart.  I choose to start my weeks on Sunday, but you can pick any day as your cutoff for a week's worth of crafting.  Just be consistent.


I've just shown a few weeks here, and a few projects at the top of my list.  Now that you have a few weeks in place, it's time to make some decisions.

How many projects can you really get to this week?  Before you even look at your list, think about your crafting style.  I like to do some cross stitch early in the morning while I drink my coffee.  I like to crochet while I watch movies on television.  I tend to do my quilting in the mid afternoon.  Would I get to each of these things in a single day?  Definitely not, but over the course of a week I sure would.  In total, I personally think I can do at least a little bit on an average of 4 or 5 different things a week.  You have to guess this for yourself.  After you do this for a few weeks you will have a much better idea.  My advice would be to start with the lowest number you think is reasonable.  Getting things finished will really motivate you.  Seeing things unfinished will do the opposite.  If you think you can only work on one thing at a time for a whole week, then this system will still work for you.

Choose the projects for this week.  This is where those categories in the fifth column help. My criteria are only suggestions.  You might have many other reasons to choose your projects.

  • Do you have a deadline coming up, like a gift that you need to finish?
  • Would you like to work on something seasonal?  I like to do Halloween projects during the Halloween season, for example.
  • Do you have a project that only needs a few hours of work?
  • Do you have a project that's all kitted up and ready to start?  Or would you like to make a kit for a project that you want to start? 
  • Look at the projects listed in blue, that you've already started.  Remember these are the UFOs you want to get done.
  • Do you have something up on a design wall that you would like to clear off?
  • Do you have a very old UFO that you want to finish once and for all so it stops nagging you?
  • Most importantly, do you have a project that just sings to you?  Something that you just can't wait to get started on but you've put it off because you've felt guilty about all the other unfinished projects around?  I hereby give you permission to dive in.  Really.  This is all about having fun and enjoying what we're doing.
The bottom line is this:  Every hour that you spend working on something is time spent getting everything closer to being finished.  If your list represents 500 hours of work, and you do something on that list for one hour, your whole pot of projects is down to 499 hours.

Move the projects that you want to work on this week to the top of the list.  You are going to visually separate what you are going to be working on from all of the other projects. They will still be there waiting for you.  Cut each line and insert it at the top of your spreadsheet underneath the headers.  Remember your limit!  If you decided you can work on 4 things, don't put 6.


My list has a five projects that have a task listed for the current week.  I have a lot of finishes coming up, but it doesn't always look like this.  Some weeks it's just about making progress on my top five projects.

Assign tasks to each project for the coming weeks.
  • If there's a deadline or a goal date, write "Finish" in the box for that week and make the box a bright color like yellow for a visual reminder of your goal.  You will see on my top line I plan to finish one of my Animal Advent projects each week starting next week.
  • If you know that you just want to put some hours in towards a long-term project, write "Work" for this week.  Keep the box white for now.  Don't worry if you don't have a finish date in mind yet.
  • Break down each project by what you reasonably think you can accomplish in a week. Fill in tasks for the coming weeks.  For example, if you are starting a quilt one week might be cut fabric, the next week might be sew blocks, then a week for borders.  If you were only working on this one project, you could probably accomplish a lot more, but this method is about moving multiple projects along every week, so keep it small.  If you end up accomplishing more, it's just a bonus.
  • Right now, you might end up with future weeks where you have more than your comfortable number of projects.  I'll talk about shifting those in the next post.  Don't worry about them. Just make sure you keep this week to your maximum number of projects.
Use color codes to track your progress.  Here comes the fun part!


  • If you work on a project at all during the week, change the box from white to green.  Any kind of progress is a wonderful thing. 
  • When you finish a project during  the week, give yourself three cheers and change that box to blue or whatever color makes you happy.
Don't delete anything at the end of the week!  In my next post I'll show you how to manage moving through your projects week-by-week and what to do with those wonderful finished boxes.


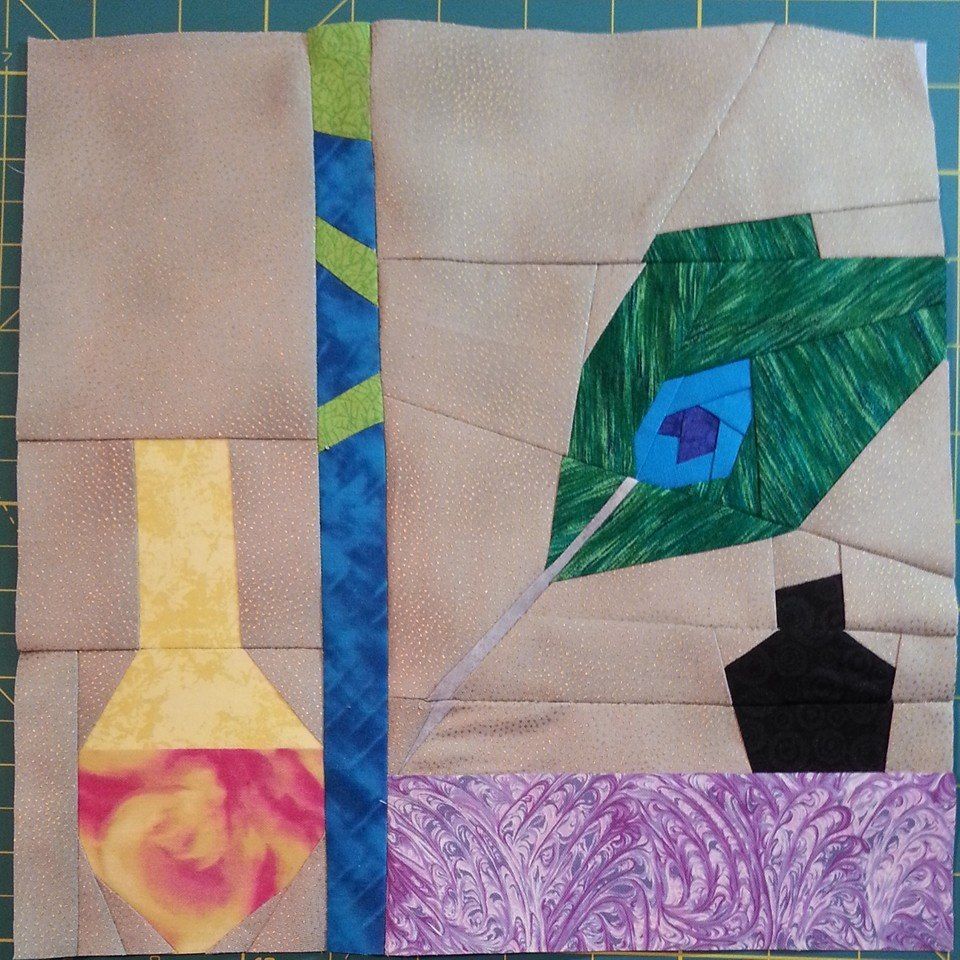
Now for today's Harry Potter quilt block:  Professor Lockhart's quill.  He used a peacock feather of course.


The block includes an inkwell, a skinny book, and a bottle of some swirling potion.  The purple book is probably "Magical Me."  Remember, if you can't read the titles on the books it means you're a muggle.

Wednesday, October 14, 2015

Organizing My Project Queue Part 1

I get a lot of projects done these days in seemingly very little time.  The truth is, I use a lot of long-term planning and work to optimize the way I work on things.  I get restless working on one project too long so I spread out my creative energy.  I always have a few projects that are 90% finished.  As I complete them, I also bring other projects up to the 90% level.

If you would like to try my system, I'll outline it for you over the course of a few separate posts.  Let me know if you give it a try, or ways that you've tweaked my design.

The key tool that I use is Microsoft Excel.  All of my planning is done on spreadsheets.  I'm going to assume you can figure out how to do very basic things in Excel.

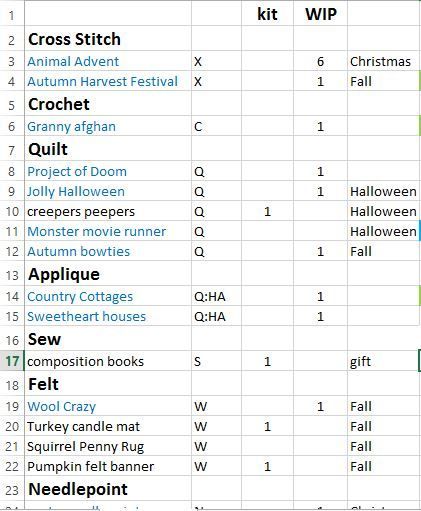
The first step that I recommend is simple.  Just write down all of your UFOs (unfinished objects) and WIPs (works in progress).  I know this is daunting - I'm still not finished finding all of mine.  Start with as few or as many as you would like.  You are not going to put all of them into your rotation, just capture that they exist.  List them in the first column of the spreadsheet.  I separated mine out by type of project.  Here is an example of some of mine.

Projects which I have not yet started are listed in black.  Projects which are underway have their title switched to blue.  Some of these have been sitting unfinished for a long time.

My second column indicates the type of  craft - X for cross stitch, etc.  This will come in handy with the next steps I show you.  For now, you can leave the second column off. 

The third column says "kit."  This tells me that I have all of the materials ready to go for those projects that I haven't started yet.  Usually this means I have pulled the fabrics and fibers together myself, but I also use this to mean a kit I purchased.  Enter the number "1" for each future project you have ready to go.

The WIP column is where I indicate all of the projects that I've started  Some, like the Animal Advent series at the top, consist of multiple parts that I've decided to count separately.  So the total that I need to do for that one is 6.  All others in this column are 1. 

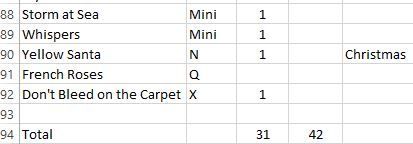
Now the reason for the numbers.  Below the last project listed, I inserted simple formulas to total up the columns.

Just click in the box where you want to add the formula and enter =SUM( )  So for example In the box that says 31 I entered =SUM(C1:C93).  I put the same thing in the next box but indicated the D column.  The great thing about inserting a formula, instead of adding it up yourself, is that if you insert another line with another project, the sum will adjust accordingly.  Likewise, as you finish projects the total will go down (yay!).

Still with me?  Check excel help if you're having trouble.  It really isn't hard once you get it once.  Also, this step is sort of for fun to see the running total.  It wont make a difference if you don't add them up.

As you can see, I have about 90 projects that I've written down so far.  Some of these are just ideas and are not kitted up. Some are big, some are small.  42 total projects that I've made a start on.  Yes, I have a problem.  But that's why I came up with this system - to clear some of these up.

Finally I added a column to indicate to myself if a project falls in a particular season or category.  For me these include Halloween, Christmas, gifts, charity, etc.  You might have your own categories.  Not every project has a category and that's fine. 

This should keep you busy for a bit.  In the next installment I'll go over the next part of the spreadsheet, which is where the fun part happens.

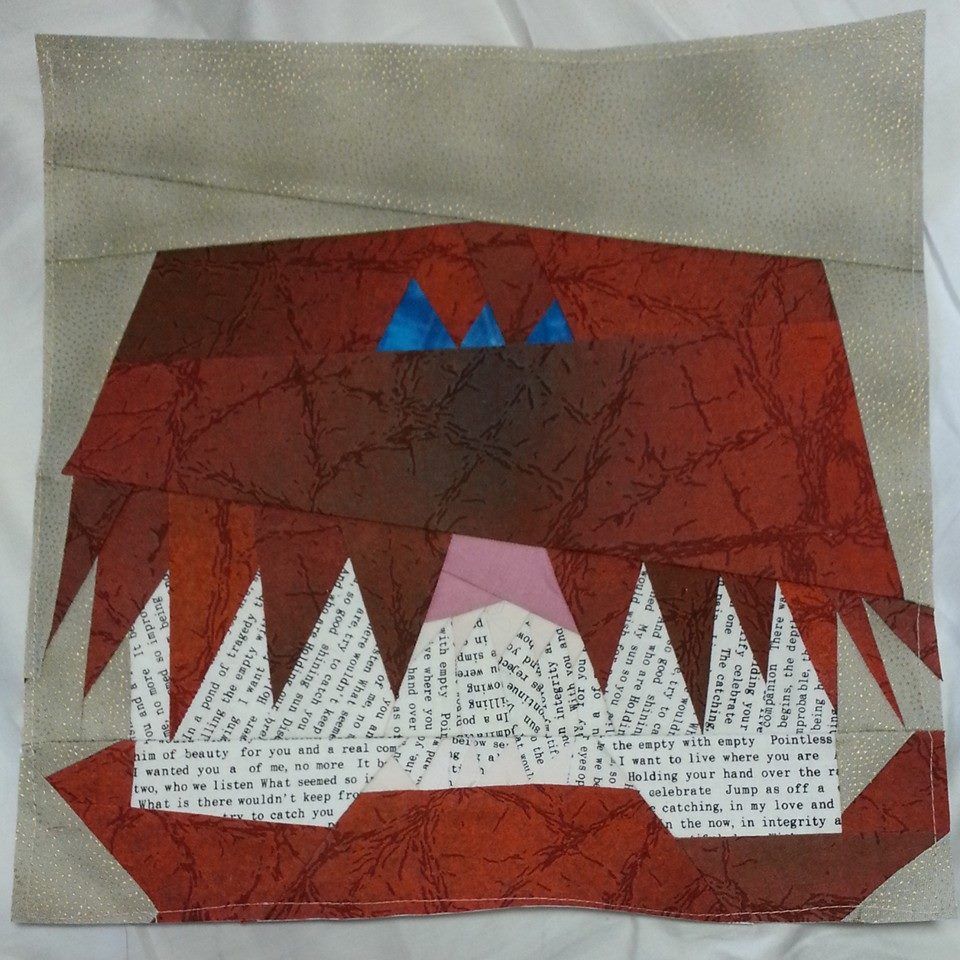
Keeping with my October Harry Potter quilt reveal, here is the next block: the Monster book of Monsters!

I knew that printed page fabric would come in handy somewhere.  Unfortunately, his teeth don't show up too well in this picture, but if you look closely in the center sections you can see them. 

LinkWithin Related Stories Widget for Blogs